Home
› How To Wire 3 Switches To One Light Diagram / Flip the Switch! - EVST 100: Intro to the Environment : With these diagrams below it will take the guess work out of wiring.
How To Wire 3 Switches To One Light Diagram / Flip the Switch! - EVST 100: Intro to the Environment : With these diagrams below it will take the guess work out of wiring.
How To Wire 3 Switches To One Light Diagram / Flip the Switch! - EVST 100: Intro to the Environment : With these diagrams below it will take the guess work out of wiring.. Tape the wire nut to the wires with electrical tape. Pick the diagram that is most like the scenario you are in and see if you can wire your switch! Connect the ground wire to the green screw. For choosing wire color for your circuit, see later in this page. The 3 wire cable enters through the top of the first switch box.
The red wire from the feed cable is connected to the top terminal, the red wire going to the light is connected to the bottom terminal, the. Three way switching schematic wiring diagram. Connect 3 wire cable in the first switch box. Want to turn a lamp on with a light switch? Mar 09, 21 09:56 pm.
How to wire three light switches to one light, only using 2 wires - Quora from qph.fs.quoracdn.net The 3 wire romex has a red wire along with the black, white, and ground. The line wire is the one that is hot all the time. The other two wires can attach to either of the identical terminals. Leave 8 inches of wire exposed at each end. 2 wire cable runs from the light to the first switch, and then 3 wire is run between all the switches. The cable going to the light switch is connected as follows (fig 2). Two way switch or three way switch: Twist the wires together with a yellow wire nut.
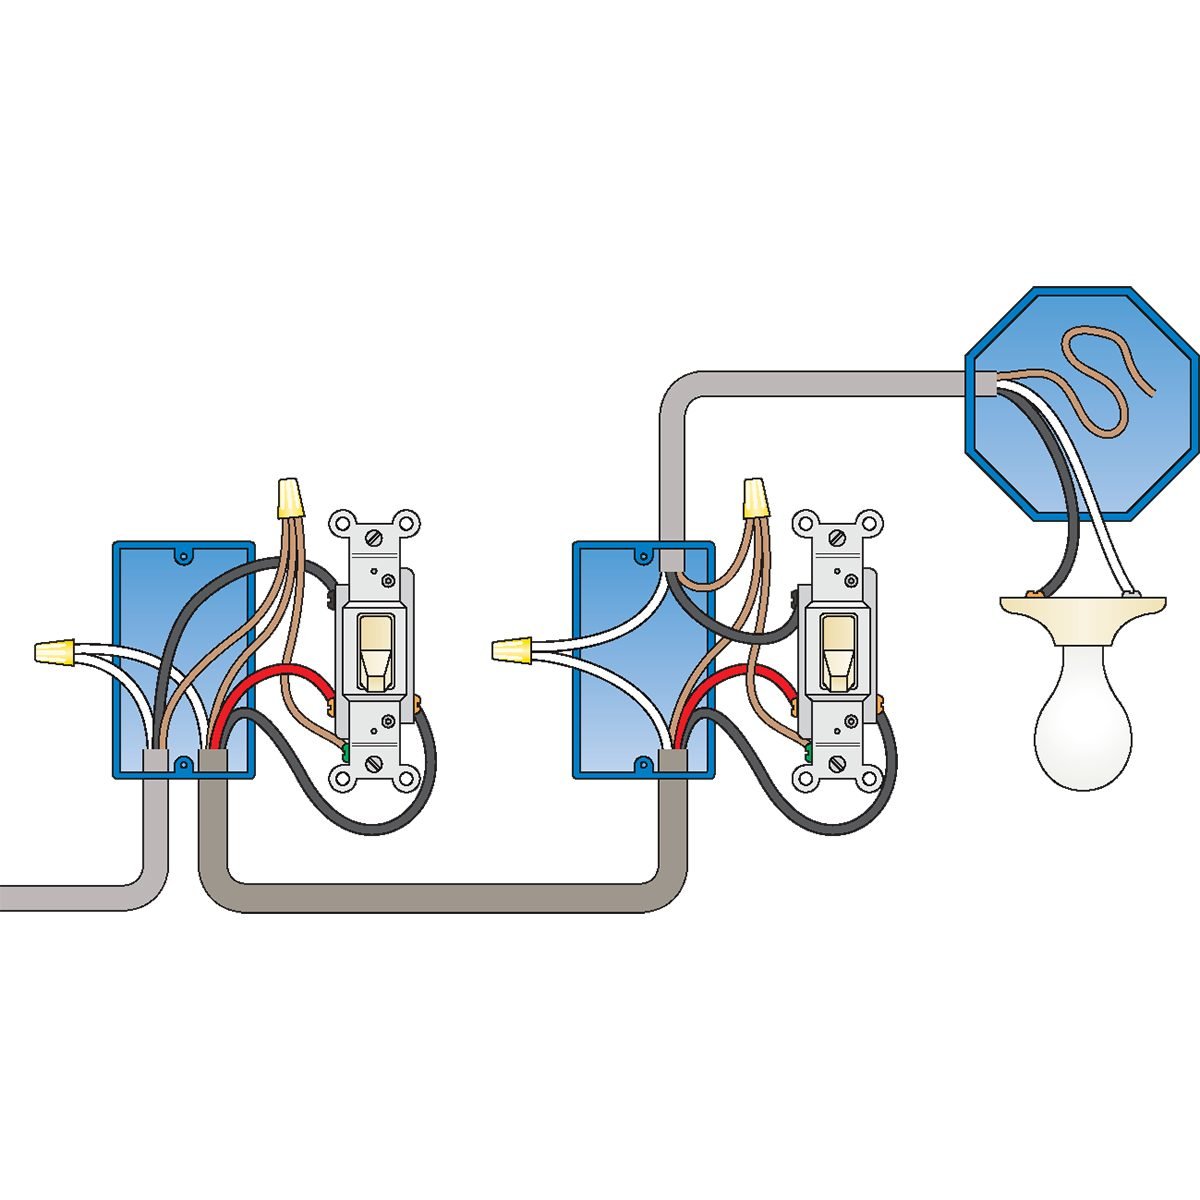
2 wire cable runs from the light to the first switch, and then 3 wire is run between all the switches.
Wiring two switches to one light fixture adds convenience to any room with two entryways. Refer to the illustrations below for doing. Need help wiring a 3 way switch? Fully explained pictures and wiring diagrams about wiring light switches describing the most common switches with photo diagram 2. Controlling a light with three or more switches. The cable going to the light switch is connected as follows (fig 2). You may have to cut small grooves or drill holes to allow the cable to run around or through the studs. Floating here means isolated from hot and neutral by switches and/or light bulbs. Choose the two klever switches that will control the same lights. Three way switching schematic wiring diagram. Two way switch or three way switch: Connect 3 wire cable in the first switch box. While i could list the steps required to do this, i.
Take a closer look at a 3 way switch wiring diagram. The line wire is the one that is hot all the time. This might seem intimidating, but it does not have to be. Sometimes it is handy to have an outlet controlled by a switch. Mar 09, 21 09:56 pm.
3 way lighting circuit | Light wiring from lightwiring.co.uk You may have to cut small grooves or drill holes to allow the cable to run around or through the studs. Controlling a light with three or more switches. Connect the ground wire to the green screw. Notice that the wire connected to the com terminals is looped straight through. The 3 wire cable enters through the top of the first switch box. The cable going to the light switch is connected as follows (fig 2). Connect 3 wire cable in the first switch box. Need help wiring a 3 way switch?
Adding an extra cable to the existing ceiling rose.
Choose the two klever switches that will control the same lights. Need help wiring a 3 way switch? Put a piece of tape on the wire that goes to the common terminal screw. The cable going to the light switch is connected as follows (fig 2). Line diagram of a one way lighting circuit using in line method (fig 1). The 3 wire cable enters through the top of the first switch box. For choosing wire color for your circuit, see later in this page. Connect the two remaining traveler wires to the two brass or light colored screws. Sometimes it is handy to have an outlet controlled by a switch. Controlling a light with three or more switches. All that's required are a few simple instructions and the ability to pay attention to detail. Mar 09, 21 09:56 pm. The ground wire goes through both switch boxes and the ceiling light box and it is connected at all junctions, except the light, with a pigtail (short piece of wire) and wire connector.
Wrap the tape around the wire nut and onto the wires. Put a piece of tape on the wire that goes to the common terminal screw. This is one of those projects that is actually easier than one might expect. Sometimes it is handy to have an outlet controlled by a switch. All that's required are a few simple instructions and the ability to pay attention to detail.
How To Wire a 3-Way Light Switch (DIY) | Family Handyman from www.familyhandyman.com With easy to follow diagrams and instructions, you can have that convenience in no time. For choosing wire color for your circuit, see later in this page. All that's required are a few simple instructions and the ability to pay attention to detail. Push the wires into the back of the gang box. With these diagrams below it will take the guess work out of wiring. Controlling a light with three or more switches. Independent light switches, no neutral wire required: 2 wire cable runs from the light to the first switch, and then 3 wire is run between all the switches.
Pick the diagram that is most like the scenario you are in and see if you can wire your switch!
The cable going to the light switch is connected as follows (fig 2). You may have to cut small grooves or drill holes to allow the cable to run around or through the studs. The line wire is the one that is hot all the time. Leave 8 inches of wire exposed at each end. The other two wires can attach to either of the identical terminals. I show all of this in the above video. Take a closer look at a 3 way switch wiring diagram. All three switches are connected together by a three core and earth control cable. These wiring diagrams help you identify the power feed and the switch leg. This is one of those projects that is actually easier than one might expect. The circuit consists of a two way switch at each end (top and bottom switches in fig 2) and an intermediate switch in the middle. Connect the wire marked common to the black or dark colored screw. With easy to follow diagrams and instructions, you can have that convenience in no time.